E3 | Shower Valve, Sloped Landscape | Ask This Old House
Season 22 Episode 3 | 23m 42sVideo has Closed Captions
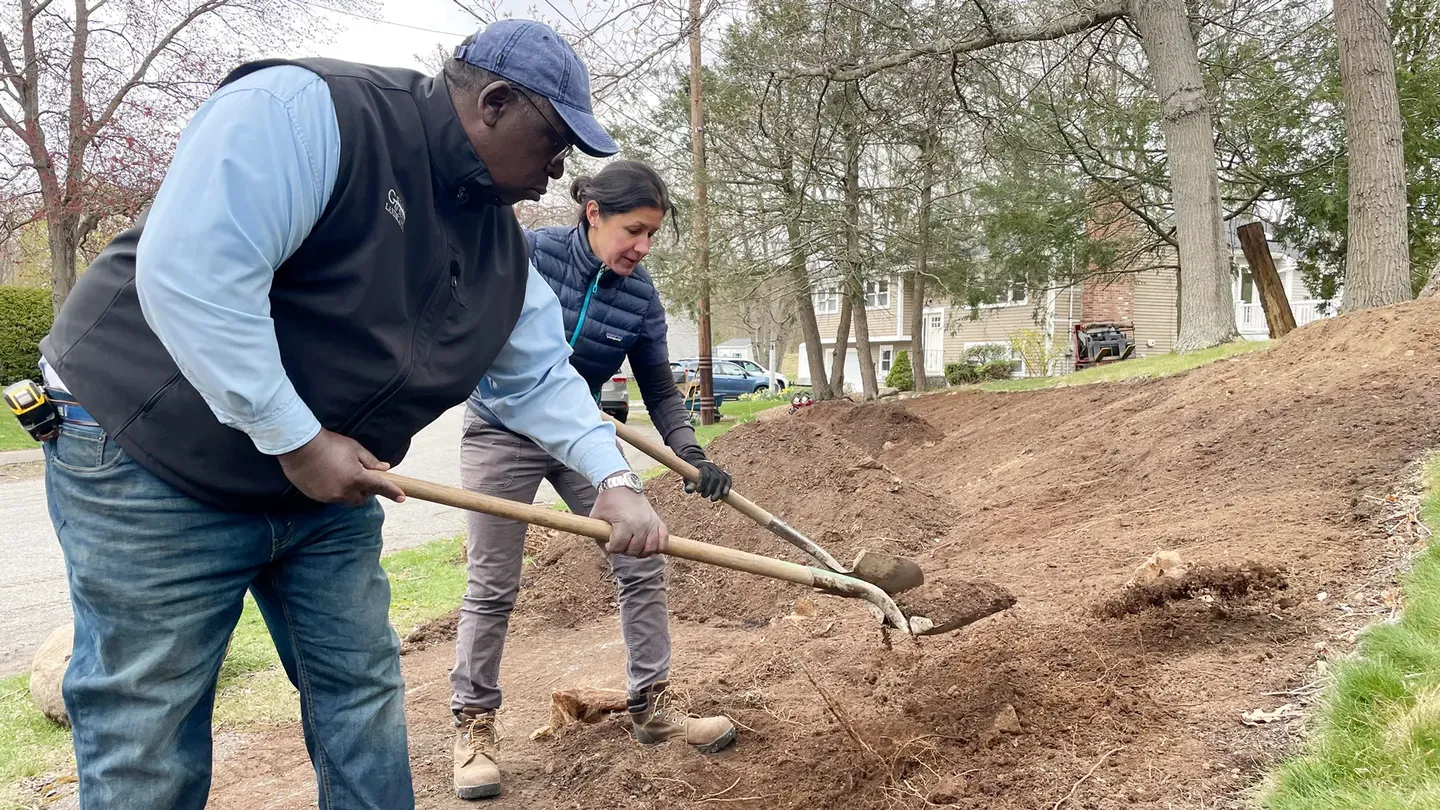
Ask This Old House celebrates Lee Gilliam; Lee and Jenn refresh an eroding sloped yard.
Ask This Old House welcomes landscape contractor, Lee Gilliam to the cast and shines a spotlight on his 30 years of experience; Richard Trethewey helps a homeowner repair a leaking 3-valve shower while retaining the bathrooms original 1930's tile; Lee and Jenn Nawada work together to refresh a homeowner's eroding sloped yard; removing excess mulch, and installing boulders and ground cover plants.
Funding for THIS OLD HOUSE is provided by The Home Depot and Renewal By Andersen.
Support provided by:

E3 | Shower Valve, Sloped Landscape | Ask This Old House
Season 22 Episode 3 | 23m 42sVideo has Closed Captions
Ask This Old House welcomes landscape contractor, Lee Gilliam to the cast and shines a spotlight on his 30 years of experience; Richard Trethewey helps a homeowner repair a leaking 3-valve shower while retaining the bathrooms original 1930's tile; Lee and Jenn Nawada work together to refresh a homeowner's eroding sloped yard; removing excess mulch, and installing boulders and ground cover plants.
How to Watch Ask This Old House
Ask This Old House is available to stream on pbs.org and the free PBS App, available on iPhone, Apple TV, Android TV, Android smartphones, Amazon Fire TV, Amazon Fire Tablet, Roku, Samsung Smart TV, and Vizio.
Keep Exploring


This Old House Insider Newsletter
Get This Old House exclusive stories, tips, and behind-the-scenes information delivered right to your inbox every month.Providing Support for PBS.org
Learn Moreabout PBS online sponsorship♪♪ Kevin: On "Ask this Old House," our experts travel across the country to answer questions about your house.
♪♪ Today, Richard gives a vintage bathroom a modern upgrade.
Richard: Here's this cover plate designed to be able to cover over those holes, and that's the finished look.
Kevin: Plus, we introduce our newest team member, landscaper Lee Gilliam.
We'll hear about his journey as a landscaper, and he and Jenn will help a homeowner with a slope that keeps sliding away on "Ask This Old House."
♪♪ Kevin: Hi there.
I'm Kevin O'Connor, and welcome back to another episode of "Ask This Old House."
As you may recall, we have been in search across the country for contractors who we believe are worth celebrating.
And one of our finds happens to be right here in our backyard.
His name is Lee Gilliam.
He has been a landscape contractor in the Boston area for 30 years, and we've asked Lee to join us this season to help us with some house calls.
So, Lee, welcome to the "Ask This Old House" family.
And, folks, we hope you enjoy Lee as much as we do.
Lee: I am Lee Gilliam, and I'm a landscaper.
I got started in my trade 30 years ago.
Started with a Toyota station wagon, small lawnmower.
And over the years, it just kept on growing, getting new customers, learning more about the trade.
Break up the roots.
And I've been doing it for 30 years and been very happy with what I do and it's been really rewarding.
This here is a foxglove.
This is one of my favorites.
This is a kousa dogwood.
Should be a nice, pretty yellowish type white flower on this one.
When I graduated high school, I started working at a company and I was assembly worker, and I needed extra money so I would get out of work at 3:00 and then go cut grass about 9:00 at night and then do it all over again the next day.
I worked at that company for 12 years.
Then I started my business full time, and it's grown ever since.
So what I want to do is do some pruning on this hydrangea.
Pretty much you just want to prune back... anything that's dead.
And if you see any buds, don't touch them.
And that should be good.
We're in a region where people love their landscaping, so, you know, that's a plus.
♪♪ This is a nice, beautiful dogwood right here.
That's a pink one.
That's a pretty dogwood.
My personal opinion, a well-maintained lawn should not have any weeds in it, such as creeping charlie, clover, dandelions.
It should have a nice color in it, nice dark green.
And a healthy lawn is nice -- nice and tight where it doesn't allow weeds to get in.
I like cobblestone edgings, and I like blue stone materials and I like natural brick look.
I like that look.
I try to edge the beds at least twice a month -- go around and re-edge them.
It looks nice and sharp.
When you get your fresh-cut lawn in the springtime and the edging is nice, it's like a nice fresh haircut, you know?
You gotta do the lineup in the back or whatever.
I've had guys with me for 20 years, so they know, you know, what I like and what our customers like.
Perfect.
They have a lot of pride.
My guys have a lot of pride in what they do.
And they're great people.
They're great.
They're great people.
Part of the family.
They're family.
I tell young people, especially people who look like me, don't give up.
If I can do it, you can do it.
Got some weeds over here I want to get rid of.
People said, "You might have gotten the job because you're a man of color."
And I said, "Well, I've lost a job because I was a man of color."
So, you know, this is a great opportunity for me and to show people that, you know, people who look like me can do it.
Stick with it for like five years.
Give it five years and put money back into your business, buying equipment.
You'll have some discouraging days, but don't give up.
It'll pay off.
It's a great profession.
♪♪ Richard: You must be Chris.
Chris: I am.
Richard: How are you?
Chris: Good morning, Richard.
Thanks for coming.
Richard: Nice to be here.
It's a beautiful house.
Chris: Thanks.
We've been here for 13 years.
Richard: Okay.
And it's -- How old is it?
Chris: Built in 1939.
Richard: I mean, look at all the cool brick details back when they used to do it that way.
Chris: Yeah, yeah.
We really like it.
Richard: But you sent me an e-mail about...?
Chris: We have a tub spout that drips.
Richard: Okay, let's go.
Let's see what you got.
It's never about the fireplace.
Chris: Nope.
So this way to the main bathroom.
We have one and a half baths.
Richard: I love how you've been respectful of all the original details.
It looks great.
Chris: Yeah.
We really like all the original features.
Richard: Talk about original.
Look at this tile.
Fabulous.
Chris: Thanks.
It's still in great shape, but the reason we called is because of the spout's leaking.
Richard: Okay.
Chris: And I've been reluctant to touch it because I don't want to ruin the tile.
Richard: Okay.
Chris: We still really like it.
Richard: Alright, well, that's the standard three valve.
And these valves are pretty straightforward.
You have a hot and a cold comes together through a diverter and the water either comes out of the spout or out of the shower head up there.
But the issue with these valves is and will always be, is that you can get scalded if somebody flushes a toilet, Chris: That happens.
Richard: I bet you it does.
You don't forget that.
So do you have access behind here?
Chris: This way.
Richard: Alright.
Chris: So the access panel is in the bedroom closet.
Richard: Alright.
That's always good to have an access.
That's great.
Okay.
There it is.
You know, these are terrific for a couple of reasons.
One is access to the valve that we're looking for.
But also, if you ever had to get down to the trap or the bath waste right there.
Now, here's the backside of our valve.
So you can see the hot, cold, tub spout up to the shower head right here.
But look at this level of tile that you have here.
You really can see it from the back here.
This was called a mud job, and it was reinforced with this metal lath.
And it's one big monolithic, solid enclosure which will last another 100 years.
Nowadays you're going to see tile on wall board or cement board.
But because we have this access, I'm going to leave you for a minute and I'm going to come back with, I think, the perfect solution for this.
Alright?
Chris: Sounds good.
♪♪ Richard: Alright.
So this is a modern pressure-balanced tub and shower valve.
You got the hot water pipe here, cold water pipe here.
And what you've got inside here is this really ingenious spindle.
And this will adjust.
Now, if I spin it back and forth, this thing's sliding back and forth.
And so what happens is if you have this installed and you flush a toilet, that means that the cold water pressure will drop and the hot will increase.
Well, this spindle will actually close the hot by the same amount.
And that means you'll get a consistent temperature here and not get scalded.
That's pretty good.
Chris: That's brilliant.
Richard: Alright.
So now it comes with a standard cover plate.
So we pull this valve out and we put this new valve in and the cover plate will only cover right here.
So that means you'd be forced to try and call a tile man or some way to patch this, and it's never going to look good.
Well, they make a pretty ingenious invention.
Here's this cover plate designed to be able to cover over those holes, and that's the finished look.
What do you think of that?
Chris: It looks great.
Richard: Alright.
So why don't we do this?
You ready to help me?
Chris: I'm ready to do it.
Why don't you run to the basement?
We're going to turn off the water.
Chris: Alright.
I'll get to it.
♪♪ Richard: Alright, so now we want to take all the trim pieces off without damaging this tile.
Alright, so now with all those [indistinct] off, all the trim gone, now we're free to cut the valve from the other side and then push it back through the tile wall.
Clean the pipe first.
Chris: Why do you need to clean it first?
Richard: Well, it just makes it easier after the cut.
So this is an interesting cutter.
It's called an imp.
It fits in really tight places.
The key on these cutters is to just get around that first revolution and make sure that the blade goes back into the groove you've started.
Okay,.
So, now you would think that this valve, it's completely cut away.
You'd think it would fall right out.
But look at this.
They've actually mudded this thing right in.
So what we want to do is try to carefully loosen it up... by just chipping away like a little archeological dig.
Okay, Chris, put the wood across the three horizontal bronze pieces.
See if we can drive this carefully back through the mud.
Chris: Okay.
You ready?
Richard: Yep.
Yep.
Good.
Keep coming.
Keep coming.
Almost there.
[ Hammer banging ] There it is.
Beauty.
Chris: Alright.
Richard: Alright, so we've got our valve out of the way, and now we've got to cut a new hole for the new pressure-balanced shower valve.
Now, here's our cover plate.
And normally, we would just go right here and open it up and there's where to be.
But look at what happens.
There's not enough space for the tub spout.
So what we're going to have to do is to artificially move the center of the new valve up a little bit.
But we got to respect this opening.
So I want a little bit of coverage for that plate.
So this is our go -- no-go point right here.
And then this will be... ...our absolute... lowest that we can go here.
So I'm just going to mark this a little bit just as a reference.
Scribe this.
Okay.
So now that's our overall plate and they make a template.
And now we're going to mark this.
Now we have to cut it without destroying all the tile.
♪♪ ♪♪ ♪♪ That was easy.
Chris: Wow.
Richard: Look at that.
I'm going to hand you this valve and I want you to hold this on the center marks that I made that just to eyeball it.
Okay?
Chris: Yep.
Richard: Alrighty.
So tell me, is that close to being on the center?
Chris: Yep.
Richard: It is?
Chris: It's a little higher than center, I would say, but... Richard: I'll allow for that.
Thank you.
Okay, I'll take that.
♪♪ ♪♪ Okay, so now you stick that spout through almost all the way through.
I'm going to flux it.
Stand by right there.
Okay, now draw it back slightly just about a half an inch back to you.
Okay, hold on.
There.
The other way.
Push.
Now push straight into me.
Hold on.
Let me work with you.
Chris: Looks pretty good.
Richard: Okay?
So now I'm going to solder this, and then I think we're good.
♪♪ ♪♪ Alright, so that should be cool enough now to put the spindle back in.
Okay.
You just don't want to melt that spindle.
And right on the shoulder there, snug it up tight.
There you go.
Right there.
Okay, good.
So now let's put the cap on.
You see there's a little cap -- threaded cap right there?
Yep.
So this is the diverter handle for the tub or shower.
And what you got to do is key it in here, but then you've got to line it up exactly right into that hole.
That's the hardest part of the job, Chris.
Nice!
Alright.
Now, two screws right there.
Alright, so we're ready for a test.
We want to send me to the basement this time?
Chris: I'll go to the basement.
Richard: Okay, good.
♪♪ Alright.
So the water is back on.
And the good news is there are no leaks.
So we're going to put our access panel on.
It's as if we were never here.
Chris: Okay.
Richard: Now, the homeowner always gets the honors -- gets to do the test drive.
So that's up to you to try this shower valve out for the first time.
Chris: Okay.
Wow.
And it looks beautiful, Richard.
Richard: So it goes from cold to hot.
Slide it, comes up out of the shower head.
So now you get to keep that classic-look bathroom with that killer tile that's never going to go south.
And now you can have a safe shower.
Chris: It's nice.
Richard: Alright?
Chris: Thank you so much.
Richard: Alright, brother.
Chris: Appreciate it.
Richard: Means I can even flush the toilet if you were in there.
Chris: Do it.
Richard: Alright.
We'll see you.
Chris: Alright.
See you.
♪♪ Jenn: Alright, Lee.
So, I'm really excited to be working together.
Lee: Same here.
This is going to be fun.
Jenn: This going to be great.
And just to recap on how I found you, do you know how I found you?
Lee: No, I don't.
Jenn: Alright.
So I was at the nursery talking to my buddies.
Right?
And then your name came up because we're always looking for new content and new people to work with.
And they said, "Hey, this guy Lee Gilliam, he's been in the industry for 30-plus years.
How do you not know him?"
And then your name kept resurfacing at every nursery I've been to and... Lee: All good, I hope, though.
Jenn: All good.
Lee: Okay.
Jenn: All good.
So I'm really excited to see what you could bring to the table on... Lee: Same here.
Jenn: ...this new project that we're going to see together.
Lee: Okay.
Jenn: Okay, so this is a sloped front yard that comes right up to the sidewalk, and there's a lot of washout.
Right?
So what are some solutions that you offer to your homeowners when you -- Lee: All depends on the budget.
You know, we could do a wall and tear it off or we could just do some ground covering to hold back the material, you know, where the foliage will spread out over time and that will hold back the mulch or whatever's running off.
Jenn: Yeah.
Lee: What do you think?
Jenn: I think that's a great idea.
You know, no matter what, we have to get something to catch the grade or make it less steep or some kind of break it up, so... Lee: Okay.
Jenn: Alright.
So let's tag team this project and make it happen.
Lee: Sounds good.
Jenn: Good morning.
Bob: Hey.
How are you?
Jenn: Good.
You must be Bob.
Bob: I am.
Yeah.
Jenn: Nice to meet you.
Here's my friend Lee Gilliam.
Lee: Morning.
How are you?
Jenn: He's here to help us.
Is this the area that you wrote in about?
Bob: It is.
We have this hill at the front of our house here that's kind of fallen down.
Every time it rains, more and more falls down.
And so looking for some help, I think, first and foremost, to keep it on the hill.
Jenn: Right.
You have half a sidewalk now, so the erosion is quite a bit.
Lee: Yeah.
Bob: And so outside of that, looking for some help to get some plants in there, something that looks nice.
Lee: Low maintenance would be great.
Some ground covering.
Jenn: Yep.
And I think we can achieve curb appeal as well as address the erosion problem.
Bob: I think that sounds great.
Absolutely.
Jenn: Alright, well, let's go do it.
♪♪ Lee: So I think we have too much mulch.
So let's measure it out.
See what we got.
Jenn: Oh my gosh.
Yeah, there's quite a bit.
Lee: So you got, you know, five, six inches of mulch -- way too much.
Bob: What's the right amount of mulch?
Lee: Sometimes less is better.
Bob: Okay.
Lee: I mean, some people think, you know, pile it on.
Doesn't work for the plants.
It will suffocate the plants.
Doesn't get proper watering, things like that.
You know?
I think here probably like maybe 2 to 3 inches, if that.
Bob: Okay.
Lee: And then also, like the flare up on the tree, they did that too much to.
Bob: What's the flare?
Lee: The flare is like a knuckle on the tree coming down and you want it to meet the ground.
Bob: Okay.
Lee: You know, and you just want just a little bit of mulch on top of that, just to hold a little moisture back.
Bob: Okay.
Jenn: What we can do is recycle this mulch because it's good stuff.
So let's stockpile it on the side.
And then when we fix the rest of the area, we'll reapply it.
Lee: Recycle it.
Bob: Wonderful.
Lee: Before you do any digging, dial 811 until the utility companies can come and mark lines such as gas, electrical and cable.
Bob: And is this stuff all transplantable?
Lee: Definitely.
Nice.
Jenn: Nice little baby.
Lee: Yep.
Beautiful.
So, we have way too much mulch in there.
Bob: How long does mulch last?
Lee: It's nice to replace it every other year.
Looks like they put plastic down.
Some people think it helps to keep the weeds out, but I'm not a fan of it.
Plants really can't get any nutrients or water.
Better off putting like a newspaper down or...
So let's try to get this flare showing on this tree.
There's too much mulch on this.
So let's get these stones out of here and maybe use them somewhere else on this project.
So, Bob, see how we have the flare coming out now?
Bob: Yeah.
Lee: Jenn took a lot of this material out, so I think we're in good shape here.
Bob: Okay.
Lee: But there's the flare coming, you know, coming out here.
Bob: Yep.
Lee: So I think we're good.
Bob: Makes sense.
Jenn: Yeah.
So we'll just take this level soil down and just shift everything down.
Lee: Exactly.
Bob: Great.
Jenn: So when I was walking around your property, I stumbled upon these boulders out back.
I mean, it looks like they used to be the old property line marker and they've rolled down the hill over the years.
Do you have any attachment to them staying here?
Bob: No.
We can do whatever you want with them.
Jenn: Alright, 'cause I think they would be perfect to help retain spots on our front slope.
Lee: I think they'll work great.
They'll hold back the mulch.
And, you know, I think they'll work good.
Jenn: Yeah, it'll really help with the erosion.
Lee: Let me grab a tree dolly so we can get them out of here.
Jenn: Yeah, let's do that.
Lee: Perfect.
[ Indistinct ] Jenn: Oh, that's a beauty.
Lee: Yeah, that's a nice stone.
Real nice stone.
Jenn: You got that?
Lee: I'm good.
Come up high.
That's pretty good.
Jenn: Alright, let's look at the face.
Oh, that's a beauty right there.
And this is what I want to do along the whole slope.
You know, not in a row, just randomly placed.
Lee: This will help the erosion.
This is perfect.
Probably spin it.
Come this way towards... Jenn: Like that way?
Lee: Okay.
Alright.
Jenn: We can get the bar, too.
Lee: Yeah.
Jenn: But you know what?
That's kind of looking good.
Lee: You like it like this?
Jenn: Yeah.
Lee: Good.
Good.
Jenn: Perfect.
Right there.
It's good.
Lee: Perfect.
Jenn: You like it?
Bob: I think it looks good.
Lee: Good.
Jenn: Alright.
Lee: Okay.
Jenn: Let's just back fill that.
Lee: Let's rototill the bed now that we have the stones in place, and we'll rototill everything up.
Try to get it down about a good 8 to 10 inches, and then that will help out the plants growing in the future.
♪♪ What we selected here was some vinca and this is a great ground cover.
I like to put them down in triangles, you know, threes.
It looks more natural.
Jenn: This one is an Andromeda, has these beautiful flowers this time of year.
It does better in the shade.
Lee: Once these plants get established, the foliage will hold back the hillside as well as the root system.
So it's a really good plant selection.
What I want to do is you dig your holes, make it a little bit bigger than the root ball.
And then I want to crunch up the root balls so the roots can open up, because they get root bound.
And then this will help to dissipate off into the compost and also into the plant tone and into the soil and into the hillside.
This is really good for the plants.
♪♪ ♪♪ ♪♪ ♪♪ What we're going to do now is put some mulch down.
It's going to hold back weeds.
It's also going to retain the water.
Jenn: Okay, Bob.
So we're done.
What do you think?
Bob: I think it looks great.
Jenn: I mean, you have a sidewalk now.
Bob: I never knew it existed.
Lee: We got some vinca down there to hold back.
Got the root flare.
We can see that now.
Jenn: And those boulders make it look like it's always been here.
But they're also going to help with holding the slope in.
Lee: Exactly.
So I need you to water every day for two weeks, okay?
And then after that, every other day for about three weeks.
And you should be all set.
Bob: I can do it.
Lee: Okay, great.
Bob: Thank you.
Lee: Thank you.
Jenn: Yeah, thanks for having us.
It's been great.
And you, thanks.
Good one.
Lee: Good one.
Jenn: And if you have questions about your house, keep them coming.
Until next time.
I'm Jenn Nawada.
Lee: And I'm Lee Gilliam for "Ask This Old House."
♪♪ ♪♪ ♪♪ Kevin: Next time on "Ask This Old House," Nathan heads to Tulsa to bring some curb appeal to a streetside utility cover in need of repair.
Then Ross will educate us on the dangers of low-level carbon monoxide exposure and what we can do to protect ourselves.
Plus, what do you do when your fireplace is covered in creosote?
Give Mark a call so he can work his magic.
All that on "Ask This Old House."


Funding for THIS OLD HOUSE is provided by The Home Depot and Renewal By Andersen.