E15 | Lexington Modern | Judgement Day
Season 45 Episode 15 | 23m 42sVideo has Closed Captions
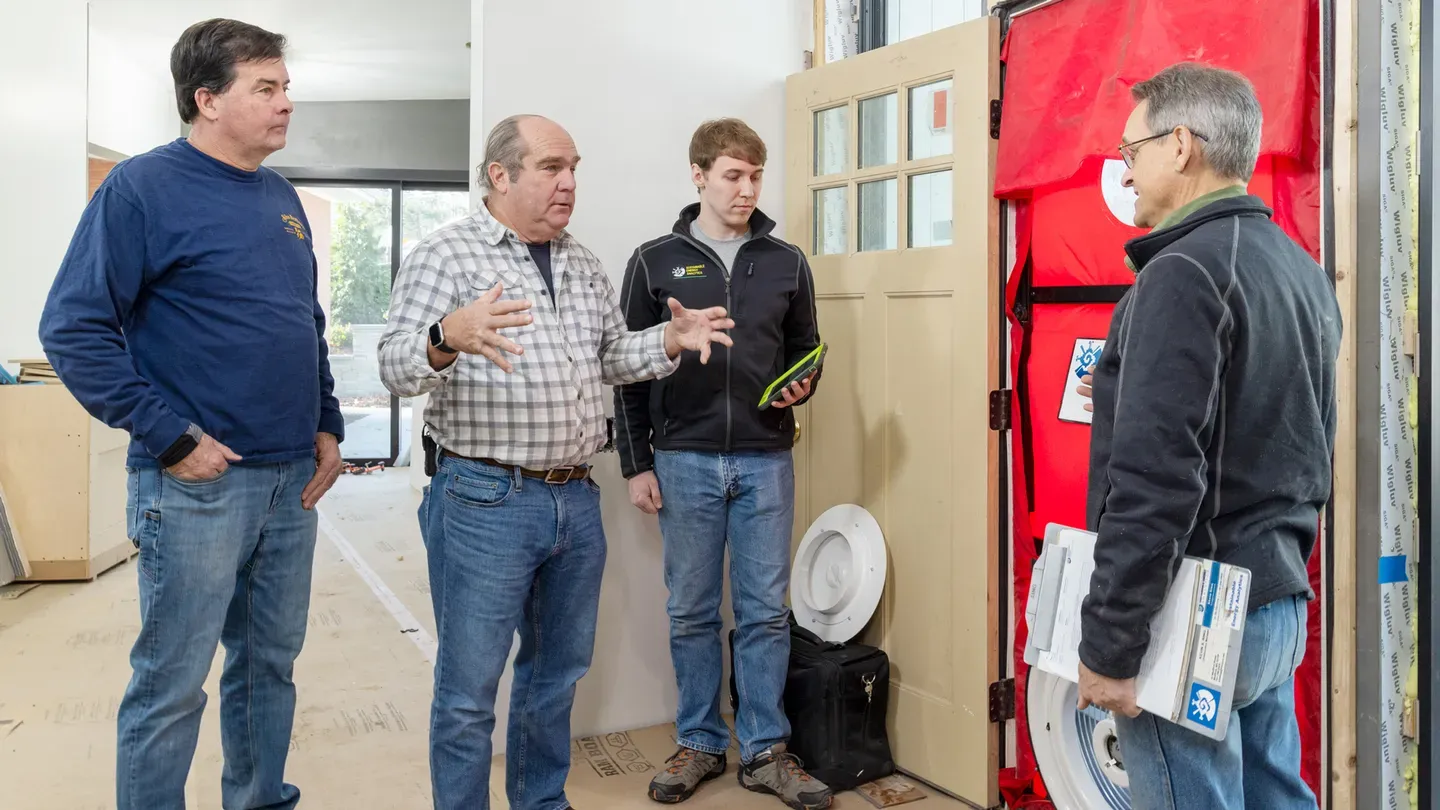
A final review of the geothermal system is done, and a blower door test is performed.
The homeowners son has Duchenne muscular dystrophy. For this reason, the 1960 mid-century modern home is being renovated to make it accessible. Outside, a pool lift was installed, and a patio with zero-threshold access to the interior was built. A final review of the geothermal system is done. Accessible kitchen appliances and a fire-rated door are installed. A blower door test is performed.
Problems playing video? | Closed Captioning Feedback
Problems playing video? | Closed Captioning Feedback
Funding for THIS OLD HOUSE is provided by The Home Depot and Renewal By Andersen.
Support provided by:

E15 | Lexington Modern | Judgement Day
Season 45 Episode 15 | 23m 42sVideo has Closed Captions
The homeowners son has Duchenne muscular dystrophy. For this reason, the 1960 mid-century modern home is being renovated to make it accessible. Outside, a pool lift was installed, and a patio with zero-threshold access to the interior was built. A final review of the geothermal system is done. Accessible kitchen appliances and a fire-rated door are installed. A blower door test is performed.
Problems playing video? | Closed Captioning Feedback
How to Watch This Old House
This Old House is available to stream on pbs.org and the free PBS App, available on iPhone, Apple TV, Android TV, Android smartphones, Amazon Fire TV, Amazon Fire Tablet, Roku, Samsung Smart TV, and Vizio.
Keep Exploring


This Old House Insider Newsletter
Get This Old House exclusive stories, tips, and behind-the-scenes information delivered right to your inbox every month.Providing Support for PBS.org
Learn Moreabout PBS online sponsorshipKevin: Today on "This Old House"... Richard: To heat and cool this mid-century modern... Ross: We tapped into the Earth's energy.
Kevin: Then we'll reveal what makes these kitchen appliances accessible.
Charlie: And it's judgment day.
Let's see if all the hard work we put into this house to make it energy-efficient pays off.
♪♪ Man: Ahh.
That's it.
♪♪ ♪♪ ♪♪ Kevin: Hey there.
I'm Kevin O'Connor, and welcome back to "This Old House" and to our project here in Lexington, Massachusetts.
where, believe it or not, we are just a couple of weeks away from completion.
Outside, you can see Jenn's landscape design coming together with the plantings in.
The outdoor kitchen has been installed as well.
We're just waiting for a stone countertop right there.
And check out the massive bluestone patio.
Most of the stone is down, except for in this corner.
The tent is keeping it warm enough so that the guys can grout the last couple pieces.
And also there will be a fire pit in that corner right there.
Now, there were a lot of reasons to renovate this old mid-century modern, but first and foremost was to make the home accessible for the family's middle son.
He was diagnosed with Duchenne muscular dystrophy.
And we know in about a year's time he's probably going to be in a wheelchair.
So accessibility is key, but also anything that we can do to improve his quality of life, well, we're trying to do that too.
So we've got this therapy pool right here, which is a nice touch.
Hey, Charlie.
Hey, Billy.
Charlie: Hey, Kevin.
Kevin: And with the therapy pool a lift, right?
Charlie: Yeah, this is a pool lift that will help anybody in the house, but most likely Billy to get Caffrey in and out of the pool.
Kevin: Gotcha.
Charlie: And it's a portable one so you just pull out the plug and drop the pin right down into the sleeve.
And now just really getting Billy used to using it.
Kevin: So once that goes in, arm comes up?
Charlie: Arm comes up, which you'll give us about a four-foot reach into the pool.
And we're still waiting for the chair actually to get here.
But looks like it's pretty simple.
Kevin: Okay.
Nice feature right, Billy?
Billy: It is.
It's nice to have the opportunity today to check it out and make sure I know what I'm doing.
Kevin: [ Laughs ] Well, I know Caffrey's going to love it, right?
If it gets him in and out of that pool, that's terrific.
Billy: Yeah.
Kevin: You know what's also going to be terrific?
Giving you the keys back in a couple of weeks.
Billy: We can't wait.
Kevin: I bet.
Alright, I'll catch up with you guys.
Well, as I said, accessibility is key.
And one of the ways to do that is to make sure that this bluestone patio comes flush with the thresholds of the entranceway.
So there was one here, there was one here.
And there's a double door behind me.
Now, if Charlie had taken this patio and he started it here, and then he pitched it away from the house, this is 24 feet, That means the patio would have been down about three inches right here.
The solution was this -- a center linear drain, which means that they can now pitch the patio from one side to the center and the other side to the center.
So we have two high points, flush here and flush over there.
There are two cap options for the grates, and I'm told that Billy and Michelle have chosen the black option right there.
And, well, the effect is terrific.
Check this out.
Bluestone patio comes right to the threshold.
No lip.
These doors will be controlled by a motor, will open easily, and you'll be able to come right into the kitchen.
The quartzite countertops are in with a big deep overhang.
We've got some appliances going in, the hood right there, and then we've got the waterfall edge detail right there.
That is a beautiful look.
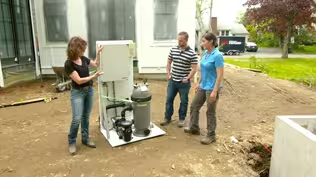
And as you push forward, we come into the living room and we've got a staircase going down to the lower level, and there's quite a bit of work still left to be done down there, but down on the lower level there is one place that is complete and that is our new mechanical room, a portion of which is dedicated to our new geothermal system.
And today we've got not one but two Tretheweys here to make sure it's up to our standards.
♪♪ Richard: So, Ross, there are a million ways you can heat or cool a building here in New England.
It could be a ducted system.
It could be heat pumps nowadays.
So you had the engineering challenge here.
What did you come up with?
Ross: Yeah.
So it all started with a conversation with Billy and Michelle to understand their goals and expectations for the project.
Right?
And one of the things that we knew is that we had a lot of glass and we had some old brick walls, right?
So we needed to think about comfort.
And the way we did that was with hydronic radiant floors.
They also wanted to be energy-efficient.
So that led us to a solar-panel system to generate electricity to be used inside the house.
Richard: What a perfect roof for it.
It's south-facing.
It's extraordinary.
Ross: It's perfect.
They also wanted to use the ground to heat and cool their building.
Richard: Sure.
Ross: So it started with a geothermal system, right?
There are four holes that are drilled 500 feet deep.
We lowered a U-bend pipe system in it, filled with liquid, grouted in place.
Each one of those supply and returns makes their way through trenches into the foundation wall.
And that is how they extract the heat and reject heat to the ground.
Richard: So it can pick up some of that 50 degrees that's under the ground, transfer it into the heating inside the building, and we can heat this place for almost free.
Ross: That's right.
Richard: Cool.
Let's go to command central.
Well, Ross, I have seen plenty of your mechanical design layouts from boiler rooms like this.
But I tell you, this is art.
Ross: Yeah, this one wins.
Richard: It's just you see it.
You know, it doesn't always get piped like this, you know?
So everything is logical and simple, really.
It seems complex, but it really isn't.
And look at this.
It's almost like artwork.
Look at the ductwork.
It's like they've painted it in.
Ross: Everything's dialed in perfect.
Richard: I wish it was always like this.
Ross: I know.
You're telling me.
So this is where the geo piping starts, right?
So here's the four supplies and the four returns coming through the foundation wall.
They're connected to these circular pumps.
Richard: Super-efficient pumps.
Ross: And this circular pump is going to be on the entire geo loop.
Right?
So it communicates from the geo heat pumps to the geo field.
This is 50 degrees on this side.
And the heat pump elevates it to 120 degrees to heat the building.
Or it can be cooled to 45 degrees to cool the building.
Richard: And these heat pumps always seem so confusing to people.
But inside it's relatively simple.
It's got a really efficient compressor inside that can change its speed, and you get heat exchangers inside, and that will actually compress the refrigerant to get it hotter, get it hot, or release the refrigerant to get it a little colder.
Ross: That's right.
And so now we can take that 45-degree water when we're cooling and store it in the chilled water tank.
Right?
So this stores nice cold water.
We can also take 120-degree water and store it in the hot tank, right?
For heating the building.
Richard: Right.
And this tank is really interesting.
This is where we store all the heated liquid that we're going to use, but the other thing is this amazing heat exchanger that goes down inside here that has potable water go through it.
So fresh water comes through, comes down.
It picks up the heat from that 120 stored.
And now it could go to the faucets.
But actually it goes over to this tank right here.
This is a hybrid water heater.
And that has a little element in it.
But what's most important is it's got a heat pump on the top.
And what that does is it, you know, these rooms can be 90 degrees because you've got all the heat coming off of the pumps and the piping.
And so now you'll take that, instead of having it be too hot, have it go right into the hot water.
Have plenty of hot water.
Ross: This is going to air-condition this room and take that heat and put it into the hot water.
Richard: Right.
It's pretty smart.
Ross: Amazingly efficient.
Richard: Pretty smart.
Ross: The other thing too, is that when we are taking this chilled water, right, and we're cooling the building, we're sending it over to air handlers like this.
So we have return air that's coming through a filter.
It comes through the air handler.
This is our chilled water or cooling piping.
Richard: Yeah.
Ross: It goes through the blower and then makes its way to the hot water coil for heating.
Richard: So here's our hot water heating coil.
And the air blows across it.
Like an automobile radiator, it heats the air.
Now, we don't have radiant everywhere in this building.
So in some cases we're going to have air handlers like this where the thermostat is going to say, "I need to be heating," and it'll use this coil, or it's going to say, "I need cooling" and it'll be using this coil.
And that's where you get that simultaneous heating and cooling that's important to you.
You know, you look at this, it's just art, but it is a fair amount of industry.
I mean, this is a big amount of money by the time you start talking about the wells and the piping and the ductwork and everything else.
Some people would say, "Why?"
Ross: Right.
Richard: What do you say to that?
Ross: I mean, it does seem over the top when you first look at it.
But, you know, the homeowners had a really long-term viewpoint on this project, right?
They had a 50-year time horizon.
And when you have a really long time horizon, the capital cost, the up-front cost doesn't matter as much.
Richard: Yeah.
Ross: And on top of that, because everything here runs on electricity, we size the solar panel system to generate the electricity that the heat pumps use, in addition to all the circulator pumps.
So effectively they are net zero, meaning they don't have a cost to heat and cool this building.
Richard: And there's a tax credit too, right?
Ross: That's right.
Federal tax credit as well.
Richard: This is the place I'm going to want to sit every time I come here.
Not in the living room anymore.
Alright.
I bet you our rating is going to be really good for my energy rater on the mechanical system, so we'll get an A+ there.
Ross: Absolutely.
Richard: Now, I got to go check with him to see how we did on our building structure.
Ross: Good luck.
Richard: Alright.
Ross: See you.
♪♪ Kevin: John, you're making some great progress for us here.
John: Thank you.
Kevin: Some smart-looking appliances too.
John: Very smart.
Kevin: Smart.
And I'm told that helps with accessibility?
John: Yes.
Correct.
So, we don't have electricity in the house yet, but this will have a feature on -- both of these ovens -- that you touch a button and then the door automatically pops open.
Kevin: Very nice.
John: And they also swing.
These are left-swing doors.
Kevin: Right.
Instead of the traditional pull-down.
John: Correct.
Yeah.
Same on this one.
Kevin: And this unit is what here?
John: This is a convection steam oven.
This replaces a traditional microwave today.
Very quick-cooking.
And it comes out very fresh with leftovers.
Kevin: Yep.
John: Things like that.
Kevin: Terrific.
John: Traditional built-in refrigerator with ice and water on the door.
Kevin: Okay.
John: Got our nice dishwasher here, waiting on a panel for that.
That's going to match the cabinetry there.
Kevin: Very nice.
Faucet.
I'm told that when the plumbing is finally connected that this is touchless as well?
John: That's correct, yeah.
Kevin: So you just wave your hand over it, nothing easier than that.
John: Correct.
Kevin: And then cooktop?
John: Yep.
So this is an induction cooktop.
Traditional cooktops have a spot for each particular pan.
Kevin: Right.
John: This cooktop does not do that.
You can put a pot anywhere on this surface here.
Kevin: Oh, very nice.
John: And then once we have electricity, the cooktop communicates with the hood via Wi-Fi.
So when you turn the cooktop on, the hood will also turn on at the same time.
Kevin: No kidding.
John: Yeah.
Kevin: Automatically?
John: Yeah.
A lot of new technology.
Kevin: No one's got to reach up here or have to reach up there.
If you can control this... John: Everything's controlled right here.
Kevin: That's very nice.
Alright.
Looks good.
I'm glad.
Anything that adds accessibility is helpful for our homeowners.
John: Yes.
That's true.
Kevin: Alright.
I'll let you get back to it.
John: You got it.
Thank you.
♪♪ Kevin: Our mudroom sits just off the center hallway and the floating staircase right here.
And you can see that on this part of the house we've got the beautiful white oak floors.
But we're hoping that the mudroom is going to be a hard working room.
So this will be tile from here forward.
And we're going to make that a nice even threshold.
The cabinetry is in, the beautiful oak seating is in.
We've got a closet on that side.
And eventually we're going to put a door in right here.
Tommy, we've got a blower-door test.
So we want to get this place sealed up as quickly as possible.
And I'm told this is a fire door.
Tom: This has to be a fire-rated door.
In other words, you have to have 20 to 30 minutes fire rating because this is a garage.
If anything should happen in the garage like a fire, you want to have 20 minutes to get out of the house.
Kevin: Alright.
So you got a temporary step right here, Tommy.
But this is going away?
Tom: It's going to go away because Caffrey's already having trouble with stairs.
So eventually we're going to put a ramp in here.
It's going to be sooner than later.
And that will help him get up here.
And then later, if he needs to wheelchair up, he can get a chair in.
Kevin: Walk now, wheel eventually.
Tom: Right.
And we'll have the special threshold, basically an accessibility threshold which is nice and flat.
So there won't be any interruption for the wheelchair or anything to trip on.
Kevin: So the tile is going to come and be installed right up to this level?
Tom: Right.
It's actually going to be a hair below this right here.
I wanted the door to be slightly higher.
So when they put the tile in, they can slide it under the threshold.
Kevin: Alright.
Well, I got my belt.
I can give you a hand.
Where do you want to start?
Tom: We're going to start on this side installing our shims on the location where the butts or the hinges are.
We'll make those plumb and then we'll put the door in and against them.
Kevin: Alright, I'll get my belt.
Tom: Alright.
So I've got a laser set up.
Now, the first thing I want to do is I want to divide the opening in half.
And the opening for the jamb on the door is 37 5/8.
That's the size of it.
Kevin: Okay.
Tom: We have to shim that in.
So if I check the -- I get 3/4 of an inch.
So I divide that in half and that would be 3/8 of an inch from the line and 3/8 of an inch from the wall.
I set up my plumb bob or the laser light randomly.
Now, if I measure from the laser light back to my division line right here, which is centering it in the opening, that's an inch and a half right there.
So that means that I want to have my shims in place so that they match up with this line right here.
So I move them in and out.
And as soon as that meets that line, I should be the right distance that I need, which is an inch and a half right there.
And I'll do that at all the hinge locations, making this side plumb.
Alright.
Now we're going to do the top hinge right here and take a measurement from the light.
Kevin: Oh, look at that.
You've got a sixth sense for these things.
That's right on.
Tom: Yeah.
Sometimes you get lucky.
Alright.
Right here on the center hinge.
Kevin: Alright, let's see.
Tom: How's that there, sonny?
Kevin: Ugg.
Nailed it again.
Perfect.
Tom: There you go.
Alright.
Okay, just a quick check.
See how we did here.
Shouldn't be any space.
Nice and plumb, perfect.
[ Drill whirring ] Okay, good.
Now, that'll hold the doorjamb flush with the wall when we push it into the opening.
Alright, let's stand it up just to give it a dry fit.
Kevin: Watch those shims, please.
Tom: Yeah.
Okay, so I think it's going to be fine.
So let's take it.
We're going to lay it back down to you.
Take it down.
Make sure you have a good grip.
Kevin: I got it.
Tom: It's heavy.
Alright.
So now what I want to do is I want to seal underneath this door right here.
I'm going to seal it with foam.
But this is a foam that is fire-rated.
Then we're going to stand it back up into the opening.
You ready there, sonny?
Kevin: Standing by.
Tom: Alright, try it.
Kevin: Like it?
Tom: Yeah.
There you go.
Alright, hold it tight on the hinge side.
Now, if I take the level and I put it on the wall, you can see that this is the old existing wall of the house.
And look at how far out of plumb it is if I hold my level plumb like that.
It's 3/4 of an inch out.
So what I'm going to do is put my level on the jamb.
You can see that the jamb is almost level.
I've got to move it in just a little bit, but you can see how far away from the face of the wall it is down here, but it's flush at the top.
So if I can just push this in just a little bit more.
Just like that.
That little bit might make a difference right there.
Check it.
Yeah, that bubble is right on.
So that door is plumb in both directions.
Kevin: That looks good there.
[ Drill whirs ] Tom: How is it there, sonny?
Speak to me.
Kevin: One more.
Hang on.
[ Hammer pounds ] Alright, set a screw.
[ Drill whirs ] [ Drill whirs ] Tom: Alright, so now our door is hung, level and plumb and even.
Next thing we have to do is air-seal the joint with the fire caulking.
Kevin: You good out there, pops?
Tom: Yep.
I'm good.
Kevin: Alright.
Oh, look at that.
Nice swing.
Good seal.
Tom: All sealed up good.
So it works good.
Feels good.
Tape up that hole and we're ready for the blower-door test.
Kevin: Nice.
♪♪ Richard: So, Charlie, as you started this project, you were presented with a new and pretty stringent energy code here.
Charlie: That's right.
Any addition that's 1,000 square feet or greater or a 50% or greater renovation is affected.
Richard: That's like almost every project, right?
Charlie: Almost all of them.
Richard: Alright.
So this is called the HERS rating, Home Energy Rating System.
It's been around for a while.
It analyzes the HVAC equipment, the appliances, but mostly the R-value of the building itself, right?
Charlie: That's right.
Richard: Now, when I started in this business -- what?
-- the HERS rating might have been 140.
If we did this project a year ago, it might have been 100, and now it is...?
Charlie: 52.
Richard: 52.
So now when you think about that, you got to start saying, "Well, where can I -- where can I improve my R-value?"
Charlie: That's right.
And when Billy and Michelle bought this, they love a mid-century modern.
They loved the glass, but they also loved the brick.
Richard: Right.
This brick is sort of such a focal point in this room, but it's not great for R-value.
Charlie: No, it's brick inside as well as outside.
And if you remember, it has that little layer of foam on the inside.
Richard: 60-year-old Styrofoam and it's barely working.
So what was the R-value of this?
Charlie: We had like an R7.
Richard: So that's not good.
And that couldn't be changed.
Charlie: That's right.
Richard: And then there was the floor, right?
This was a concrete slab and the R-value was...?
Charlie: Zero.
Richard: Zero is not good.
Charlie: Not good.
So we demoed all the concrete.
We saw-cut it, had a mini excavator in here.
Made the work easy.
But it was a lot of work.
Richard: So it was so dramatic to see it all come out.
But it was great because it actually provided a place for us to run ductwork for air conditioning here.
Charlie: And once all the ductwork was run, we encased it with foam insulation, refilled all the trenches, compacted it.
Then I took another layer of closed-cell foam and encase the entire floor, wrapped it up the foundation, about two more inches of closed cell, and that gave us an R-value of about 15 alone.
Richard: And then you finished it off with... Charlie: Another layer of concrete sleeper system with two inches of foam infilled, a layer of subflooring radiant panel, then our finished white oak again.
Richard: An unbelievable sandwich.
And it all came out perfectly to grade.
And the R-value was...?
Charlie: I think we have around a 17 or 20.
Richard: Which is great.
Charlie: It's very good.
Richard: Alright.
So the question is whether all these things are going to make us pass our test.
So, Charlie, you guys have worked really hard to get to this test day with our HERS rater, Kevin Ring.
Hey, Kevin.
Kevin R.: Good morning, gentlemen.
Richard: Nice to see you.
So, take us through the HERS rating system.
Kevin R.: Well, we started at the beginning with a projected energy model, which is an energy model based upon our assumptions and best guesses as to what's going to go into the walls and the roof and the equipment.
Richard: So you entered it all into a computer.
Kevin R.: We put this all in based upon assumptions at the beginning.
Richard: Yeah.
Kevin R.: And then we visit during the course of the work to verify all the materials that went in.
Then we collected all of the make and model number from the mechanical equipment, and we get the energy-efficiency specifications for that material.
And the last remaining unknown is the infiltration rate for the house, and that -- Richard: The actual way that the house was built and assembled?
Kevin R.: That represents how drafty the house would be on a windy day.
Richard: Okay.
Kevin R.: And we test that with a blower door.
Richard: Right.
So you got your blower door?
Kevin R.: Yes, we do.
Richard: Alright, let's start the test.
Kevin R.: We'll set that up now.
♪♪ ♪♪ ♪♪ ♪♪ ♪♪ Richard: Alright, so blower-door fan is on.
So take us through this test.
Kevin R.: What the fan does is it blows air out of the house until we've achieved a pressure difference between inside and outside.
And that pressure difference is 50 pascals.
Richard: Pascals.
And that's equivalent to like a 20-mile-an-hour wind, right?
Kevin R.: Yes.
And then what the fan will measure, in cubic feet per minute, how much air we have to blow in order to achieve that particular pressure.
Richard: How much time do you need to get that reading with a big house like this?
Kevin R.: The fan takes about 10 minutes.
Richard: Okay.
Kevin R.: At different speeds.
Richard: Alright.
I'm going to get coffee.
You want coffee?
Charlie: Let's go.
♪♪ Richard: Alright.
Our test is done.
Kevin R.: Yes, it is.
Richard: What'd you find out?
Kevin R.: The blower-door test is done.
It came out to 1.4 ACH, air changes per hour.
Richard: In the old days, what would we see before a tight building like this?
Kevin R.: Oh, you'd see 8 to 20 ACH.
Richard: So this building is tight?
Kevin R.: Yes.
Charlie: So I'm dying to know.
How did we do?
Kevin R.: Well, we put this 1.4 ACH into the energy model, and the HERS rating came out to 39.
Charlie: 39?
Looks like we're overachievers.
Richard: Wow.
You are.
Kevin R.: That's a tribute to your fine work.
Charlie: Well, thank you, but a lot went into it for all of us.
Richard: Right.
Thank you, guys.
Charlie: Thank you.
Richard: So, you know, say you hadn't made that.
The other great tool you have is that smoke stick.
You know, if there's a little slightest infiltration with the door -- blower door on, you can just see it.
And that can teach so much.
Charlie: That's right.
If you miss the smallest thing, like not insulating around a window or a slight crack in an opening, that smoke test really shows it well.
Richard: That's right.
So what do you think?
Charlie: Well, if you really think back 10 months ago when we started this process, you really have to be eyes wide open going into it and let the homeowners really know what all this is going to cost.
Richard: You know, this building will be here for the next 100 years and it will be tight and easy to operate forever.
So I'm of two minds.
Charlie: I agree with you.
Richard: But congratulations.
You always do better than the test.
Charlie: Thanks, bud.
It was a good team effort.
♪♪ Kevin: Alright, pops, a lot of progress, but still a lot left to do.
Tom: Well, the final push is on right now.
We got a lot to do.
Kevin: Alright, well, until next time, I'm Kevin O'Connor.
Tom: And I'm Tom Silva.
Kevin: For "This Old House" here in Lexington, Massachusetts.
So another mid-century modern.
Tom: Yeah.
It looks good, though.
I like them.
I like them.
♪♪ Kevin: Next time on "This Old House"... Just 10 months ago, construction began on this mid-century modern with a mission in historic Lexington, Massachusetts.
The task -- transform the space into an accessible home but preserve the original character.
It was a race to the finish.
But move-in day is here, and it's time to find out if Charlie and his crew are ready to hand over the keys.
That's next time.


- Home and How To

Hit the road in a classic car for a tour through Great Britain with two antiques experts.


Support for PBS provided by:
Funding for THIS OLD HOUSE is provided by The Home Depot and Renewal By Andersen.